UIExtenderEx
UIExtenderEx is a powerful library that allows modders to modify and extend the game's user interface (UI) without directly editing XML files. It provides a flexible way to inject new UI elements, modify existing ones, and create dynamic behaviors.
Prerequisites
Before you begin, ensure you have the following:
- Basic Knowledge of C# Programming: Familiarity with C# and .NET development.
- Visual Studio or Visual Studio Code: An integrated development environment (IDE) for coding.
- Mount & Blade II: Bannerlord Installed: Access to the game's files for modding.
- Modding Tools: Familiarity with modding tools like dnSpy or Visual Studio for decompiling and inspecting game code.
Activation
Should be included into project's .scproj file
<ItemGroup>
    <PackageReference Include="Nullable" Version="1.3.1" PrivateAssets="all" IncludeAssets="runtime; build; native; contentfiles; analyzers; buildtransitive" />
    <PackageReference Include="IsExternalInit" Version="1.0.3" PrivateAssets="all" IncludeAssets="runtime; build; native; contentfiles; analyzers; buildtransitive" />
    <PackageReference Include="Bannerlord.BuildResources" Version="1.0.1.85" PrivateAssets="all" IncludeAssets="runtime; build; native; contentfiles; analyzers; buildtransitive" />
    <PackageReference Include="Lib.Harmony" Version="2.2.2" IncludeAssets="compile" />
    <PackageReference Include="Harmony.Extensions" Version="3.1.0.67" PrivateAssets="all" IncludeAssets="runtime; build; native; contentfiles; analyzers; buildtransitive" />
    <PackageReference Include="BUTR.Harmony.Analyzer" Version="1.0.1.44" PrivateAssets="all" IncludeAssets="runtime; build; native; contentfiles; analyzers; buildtransitive" />
    <PackageReference Include="Bannerlord.UIExtenderEx" Version="2.8.0" IncludeAssets="compile" />
</ItemGroup>
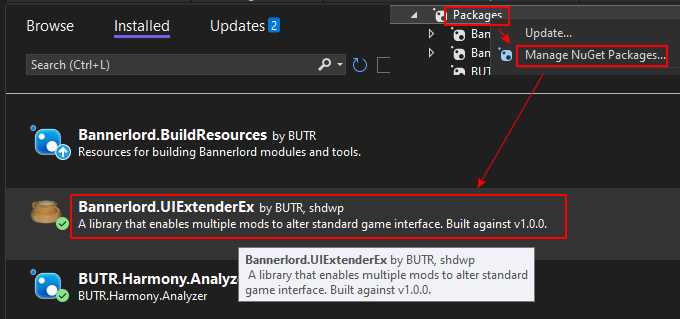
Should be visible in the Dependencies:

Register in the OnSubModuleLoad()
Understanding Basics
UIExtenderEx operates by allowing you to manipulate the game's UI trees at runtime. Key concepts include:
- Views: Represent UI screens or components.
- UI VMs (UI Virtual Machines): Control the behavior of the UI elements.
- Extensions: Classes that define how and where to inject new UI elements.
Steps for adding a UI element
Workflow overview
- Make changes in XML file for quick start
- Make Mixin class and feed variables from it to your XML
- Inject XML with your variables from Mixin
1. Find the necessary XML Prefab
Most of them are in the /Sandbox/GUI/Prefabs/, example:
/Sandbox/GUI/Prefabs/Encyclopedia/EncyclopediaSubPages/EncyclopediaHeroPage.xml
2. Copy this prefab XML to your mod's GUI/Prefabs folder
Keep the same folder structure:
/YOUR_MOD/GUI/Prefabs/Encyclopedia/EncyclopediaSubPages/EncyclopediaHeroPage.xml
3. Add your element into XML
Find a place where to put your element and add it.
It can take some effort to understand the internal structure of such XMLs.
Some Widgets and their attributes are documented here.
Do not forget to make it visible:
IsVisible="true"
Code example:
<!--Left Side Character Properties-->
<Widget HeightSizePolicy ="StretchToParent" WidthSizePolicy="Fixed" SuggestedWidth="370" Sprite="General\CharacterCreation\character_creation_background_gradient">
    <Children>

        // new code
        <Widget WidthSizePolicy="Fixed" HeightSizePolicy="Fixed" SuggestedWidth="70" SuggestedHeight="70" MarginLeft="30" MarginTop="190" HorizontalAlignment="Left" Sprite="SPGeneral\Clan\Status\icon_pregnant" IsVisible="true">
          <Children>
            <HintWidget DataSource="{PregnantHint}" WidthSizePolicy="StretchToParent" HeightSizePolicy="StretchToParent" Command.HoverBegin="ExecuteBeginHint" Command.HoverEnd="ExecuteEndHint" />
          </Children>
        </Widget>
...

4. Test in the game
When UIExtenderEx is loaded, then XML files in your mod's folder are used instead of the game's XML files (prefabs).
This allows to quick and convenient testing. Make a change in the XML and see it instantly in the game. Just reopen the target window you are modifying.
No reload/restart is necessary.
Restart is necessary when new XML is added into your mod's GUI/Prefabs folder.
After you are happy with your changes - check on different screen resolution if it's not messed up
5. Find the class that manages your prefab (window)
Usually it's XML file name + "VM", in our example: EncyclopediaHeroPage.xml -> EncyclopediaHeroPageVM.
Must check in dnSpy to be sure and do not waste time later.
Be careful by selecting the correct class. For example classes CharacterDeveloperVM and ClanMembersVM manage whole windows, but if you want to add something to the hero, then you need CharacterVM and ClanLordItemVM classes instead.
6. Find the Refresh method for that class
To use the OnRefresh overload you will need to specify for UIExtenderEx the underlying method that acts as the conceptual 'Refresh' method in the ViewModel.
For example, MapInfoVM has a method Refresh.
If such method exists, specify it in the ViewModelMixin like this:
[ViewModelMixin("Refresh")] // or [ViewModelMixin(nameof(MapInfoVM.Refresh))] // if the method is public
public class MapInfoMixin : BaseViewModelMixin<MapInfoVM>
In our example it's public override void RefreshValues():
7. Create BaseViewModelMixin class in your project
Use the class and Refresh method you found before to create Mixin class.
Code example:
[ViewModelMixin("RefreshValues")]
internal class EncyclopediaHeroPageVMMixin : BaseViewModelMixin<EncyclopediaHeroPageVM>
{
    private readonly EncyclopediaHeroPageVM _pageVM;        // class we create mixin for
    private bool _exampleSpriteVisible;
    private HintViewModel _exampleSpriteHint;
    private string _exampleSprite;

    public EncyclopediaHeroPageVMMixin(EncyclopediaHeroPageVM vm) : base(vm)
    {
        _pageVM = vm;
        ExampleSpriteVisible = false;
        ExampleSpriteHint = new HintViewModel();
        ExampleSprite = "";
    }

    public override void OnRefresh()
    {
        if (_pageVM.Obj == null) return;
        Hero? hero = _pageVM.Obj as Hero;
        if (hero == null || !hero.IsKnownToPlayer) return;
        ExampleSpriteVisible = true;
        ExampleSpriteHint = new HintViewModel(new TextObject("This is example hint!"), null);
        ExampleSpriteSprite = "General\\Icons\\Production\\cheese\";
    }

    [DataSourceProperty]
    public bool ExampleSpriteVisible
    {
        get => _exampleSpriteVisible;
        set
        {
            if (value != _exampleSpriteVisible)
            {
                _exampleSpriteVisible = value;
                ViewModel!.OnPropertyChangedWithValue(value);
            }
        }
    }

    [DataSourceProperty]
    public HintViewModel ExampleSpriteHint
    {
        get
        {
            return this._exampleSpriteHint;
        }
        set
        {
            if (value != this._exampleSpriteHint)
            {
                this._exampleSpriteHint = value;
                ViewModel!.OnPropertyChangedWithValue<HintViewModel>(value, "ExampleSpriteHint");
            }
        }
    }

    [DataSourceProperty]
    public string ReligionSymbolSprite
    {
        get => _religionSymbolSprite;
        set
        {
            if (value != _exampleSprite)
            {
                _exampleSprite = value;
                ViewModel!.OnPropertyChangedWithValue(value);
            }
        }
    }

}
8. Use your new variables in the XML and test in-game
Enter ExampleSpriteVisible, ExampleSpriteHint and ReligionSymbolSprite in the XML file and test in-game with restart for mixin class to take effect.
<Widget WidthSizePolicy="Fixed" HeightSizePolicy="Fixed" SuggestedWidth="70" SuggestedHeight="70" MarginLeft="30" MarginTop="190" HorizontalAlignment="Left" Sprite="@ExampleSprite" IsVisible="@ExampleSpriteVisible">
    <Children>
        <HintWidget DataSource="{ExampleSpriteHint}" WidthSizePolicy="StretchToParent" HeightSizePolicy="StretchToParent" Command.HoverBegin="ExecuteBeginHint" Command.HoverEnd="ExecuteEndHint" />
    </Children>
</Widget>
If all goes well you should see cheese icon instead of the pregnant icon.
If does not work - check class and Refresh method
9. Get rid of the XML file
XML file was great for testing and initial proof-of-concept, but it is better to do direct XML injection into the game files in case something changes with game updates.
For that disable the XML file by renaming it's extension to something like NAME.xml_dev so the game would not use it anymore.
10. Create PrefabExtensionInsertPatch
Code example:
[PrefabExtension("EncyclopediaHeroPage", "descendant::Widget[@Sprite='General\\CharacterCreation\\character_creation_background_gradient']/Children/Widget")]
internal class EncyclopediaHeroPageReligionSymbolExtension : PrefabExtensionInsertPatch
{
    public override InsertType Type => InsertType.Prepend;
    private XmlDocument document;
    public EncyclopediaHeroPageReligionSymbolExtension()
    {
        document = new XmlDocument();
        document.LoadXml("<Widget WidthSizePolicy = \"Fixed\" HeightSizePolicy = \"Fixed\" SuggestedWidth = \"70\" SuggestedHeight = \"70\" MarginLeft = \"30\" MarginTop = \"170\" HorizontalAlignment = \"Left\" Sprite = \"@ReligionSymbolSprite\" IsVisible = \"@ReligionSymbolVisible\" > <Children> <HintWidget DataSource = \"{ReligionSymbolHint}\" WidthSizePolicy = \"StretchToParent\" HeightSizePolicy = \"StretchToParent\" Command.HoverBegin = \"ExecuteBeginHint\" Command.HoverEnd = \"ExecuteEndHint\" />  </Children>  </Widget>");
    }

    [PrefabExtensionXmlDocument]
    public XmlDocument GetPrefabExtension() => document;
}
Be careful with XPath in descendant:: and with LoadXml - these parts are very sensitive and can lead to crashes
Here you will need XPath knowledge XPath Tutorial/Xpath Cheatsheet and understanding about different types of InsertType(s)
Changes to this class requires game restart so it's annoying to troubleshoot. To ease the pain, the XML in document.LoadXml can be saved in XML file and loaded dynamically with:
Example at the end of this page.Tips for Proper UI Placement
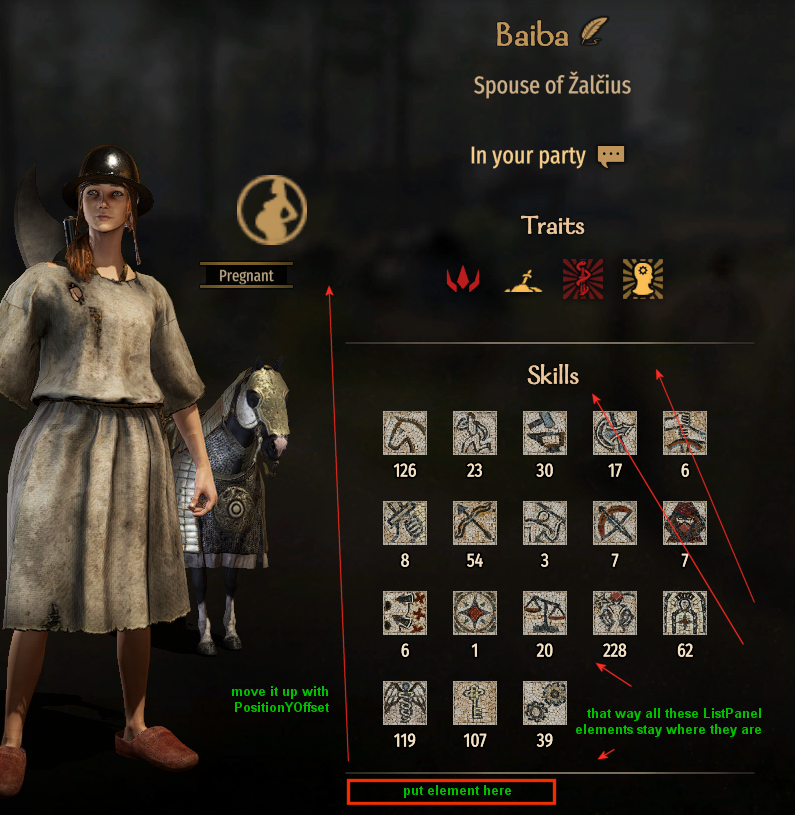
Usually if there are no crashes - it will work :) The most frequent problem I encounter is how to properly place a new element without disrupting the existing elements. And how to make a Hint actually show up...
-
Understand the UI Hierarchy: Use tools like dnSpy to navigate the game's UI structure.
-
Use Accurate XPath Expressions: Precise XPath expressions ensure your elements are inserted in the correct location.
-
Be Mindful of Layout Methods: Understand how StackLayout, GridLayout, and other layout methods affect element positioning.
-
Avoid Disrupting Existing Elements: Ensure that your new elements don't overlap or interfere with existing UI components.
-
Test Thoroughly: Always test your changes in-game to catch any visual or functional issues.
Element placement tip
Hint
private HintViewModel _exampleHint; // definition

ExampleHint = new HintViewModel();  // in constructor

[DataSourceProperty]
public HintViewModel ExampleHint
{
    get
    {
        return this._exampleHint;
    }
    set
    {
        if (value != this._exampleHint)
        {
            this._exampleHint = value;
            ViewModel!.OnPropertyChangedWithValue<HintViewModel>(value, "ExampleHint");
        }
    }
}
I had the most problems with Hint elements. They usually do not show up for me.
There were several reasons for it:
- Bad class implementation
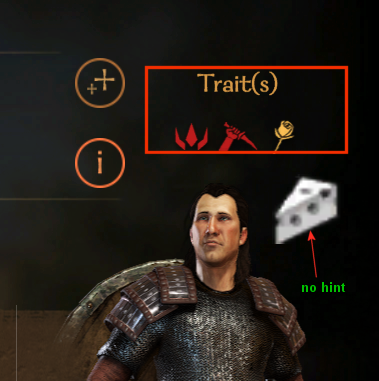
- Hint outside of the <ListPanel> - it does not show up for me if it's not inside <ListPanel> WHY???
- Hint outside of the <ListPanel>'s zone, like SuggestedHeight="75" but hint is placed lower, so does not work, need to change SuggestedHeight="175" or similar
Example when Sprite with Hint is outside of the <ListPanel> zone
CRASHES
PrefabExtension
XPathException: Expression must evaluate to a node-set.
Crash when modified page is opened. Game tries to parse XML at that time.
CAUSE: Error in [PrefabExtension("SOME_CLASS", "descendant::...")]

Example:
[PrefabExtension("EncyclopediaHeroPage", "descendant::/Prefab/Window/BrushWidget/Children/Widget/Children/ListPanel/Children")]
Crash because of the symbol / before the 'Prefab'
no crash:
[PrefabExtension("EncyclopediaHeroPage", "descendant::Prefab/Window/BrushWidget/Children/Widget/Children/ListPanel/Children")]
When XPath in PrefabExtension is wrong, it will show the error message:

PrefabExtensionInsertPatch
Failed to find appropriate constructor for patch!
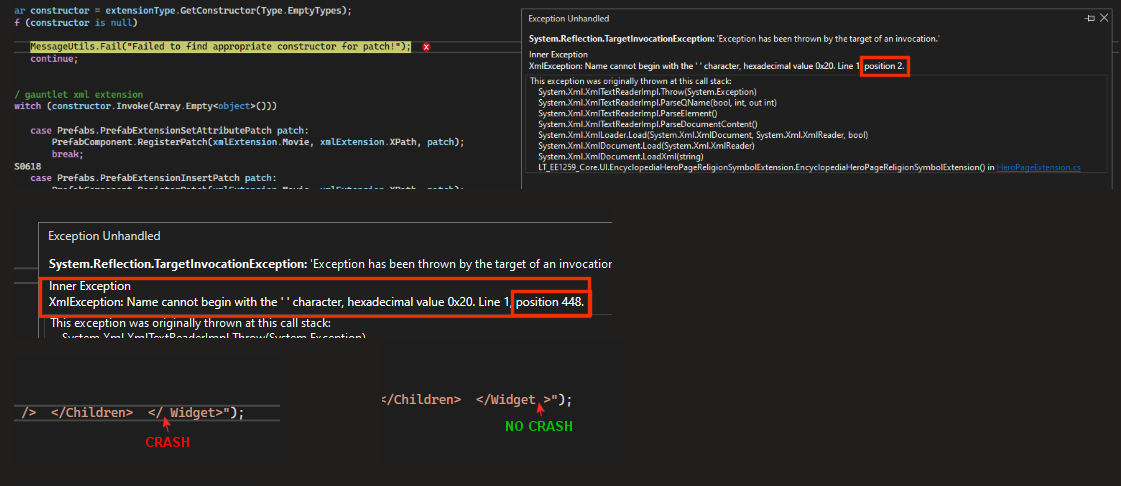
CAUSE: Error in document.LoadXml()
Crashes on initial game start on the first load screen, before the menu.
Error shows exact place where the problem is. Just make sure to count without the / symbols in your string.
Be careful with the spaces:
Change/add an attribute
PrefabExtensionSetAttributePatch
Patch that adds or replaces a node's attributes. The target node should be specified by the XPath in the PrefabExtension If the attribute already exists on the target node, it's value will be replaced by the specified value. Otherwise, the new attribute is added with the specified value.
// enable hero rotation and disable hints on traits (in Character C menu)
[PrefabExtension("CharacterDeveloper", "descendant::CharacterTableauWidget")]
internal class CharacterDeveloper_CharacterTableauWidget_EnableHeroRotation_Patch : PrefabExtensionSetAttributePatch
{
    public override List<Attribute> Attributes => new()
    {
        new Attribute( "IsEnabled", "true" )
    };
}
Another example
[PrefabExtension( "ExampleFile", "descendant::OptionScreenWidget[@Id='Options']/Children/OptionsTabToggle" )]
internal class AddMultipleAttributesExamplePatch : PrefabExtensionSetAttributePatch
{
    public override List<Attribute> Attributes => new()
    {
        new Attribute( "IsVisible", "@IsDefaultCraftingMenuVisible" ),
        new Attribute( "IsEnabled", "true" )
    };
}

<!-- ExampleFile.xml -->
<!-- Before Patch -->
<Prefab>
    <Window>
        <OptionsScreenWidget Id="Options">
            <Children>
                <OptionsTabToggle IsVisible="true"/>
            </Children>
        </OptionsScreenWidget>
    </Window>
</Prefab>

<!-- After Patch -->
<Prefab>
    <Window>
        <OptionsScreenWidget Id="Options">
            <Children>
                <OptionsTabToggle IsVisible="@IsDefaultCraftingMenuVisible" IsEnabled="true"/>
            </Children>
        </OptionsScreenWidget>
    </Window>
</Prefab>
Interacting with Other Mods
You can access another mod's UIExtender and modify it to your liking.
At the moment you are able to disable the UIExtender, deregister it (meaning fully disabling it without the ability to enable it back) and enable.
You are able to disable a specific Prefab or Mixin.
// Get Mod Configuration Menu's UIExtender
var mcm = UIExtender.GetUIExtenderFor("MCM.UI");

// Disable a prefab
var mcmPrefab = AccessTools.TypeByName("MCM.UI.UIExtenderEx.OptionsPrefabExtension1");
mcm.Disable(mcmPrefab);

// Disable a Mixin
var mcmMixin = AccessTools.TypeByName("MCM.UI.UIExtenderEx.OptionsVMMixin");
mcm.Disable(mcmMixin);
Notes
- Needs game restart on every change in the code... (At least editing main map)
- When UIExtenderEx is loaded, it is possible to copy game's /GUI/Prefabs/*.xml files into own mod's /GUI/Prefabs folder and change them to see quick result of the change